
Want to learn how to make a snow globe tumbler with glitter? This tutorial will cover everything you need to know about making a DIY snow globe tumbler like which tumbler to use, liquids to use, degassing a snow globe tumbler, and more! Let’s make a glitter tumbler.
This post contains affiliate links!
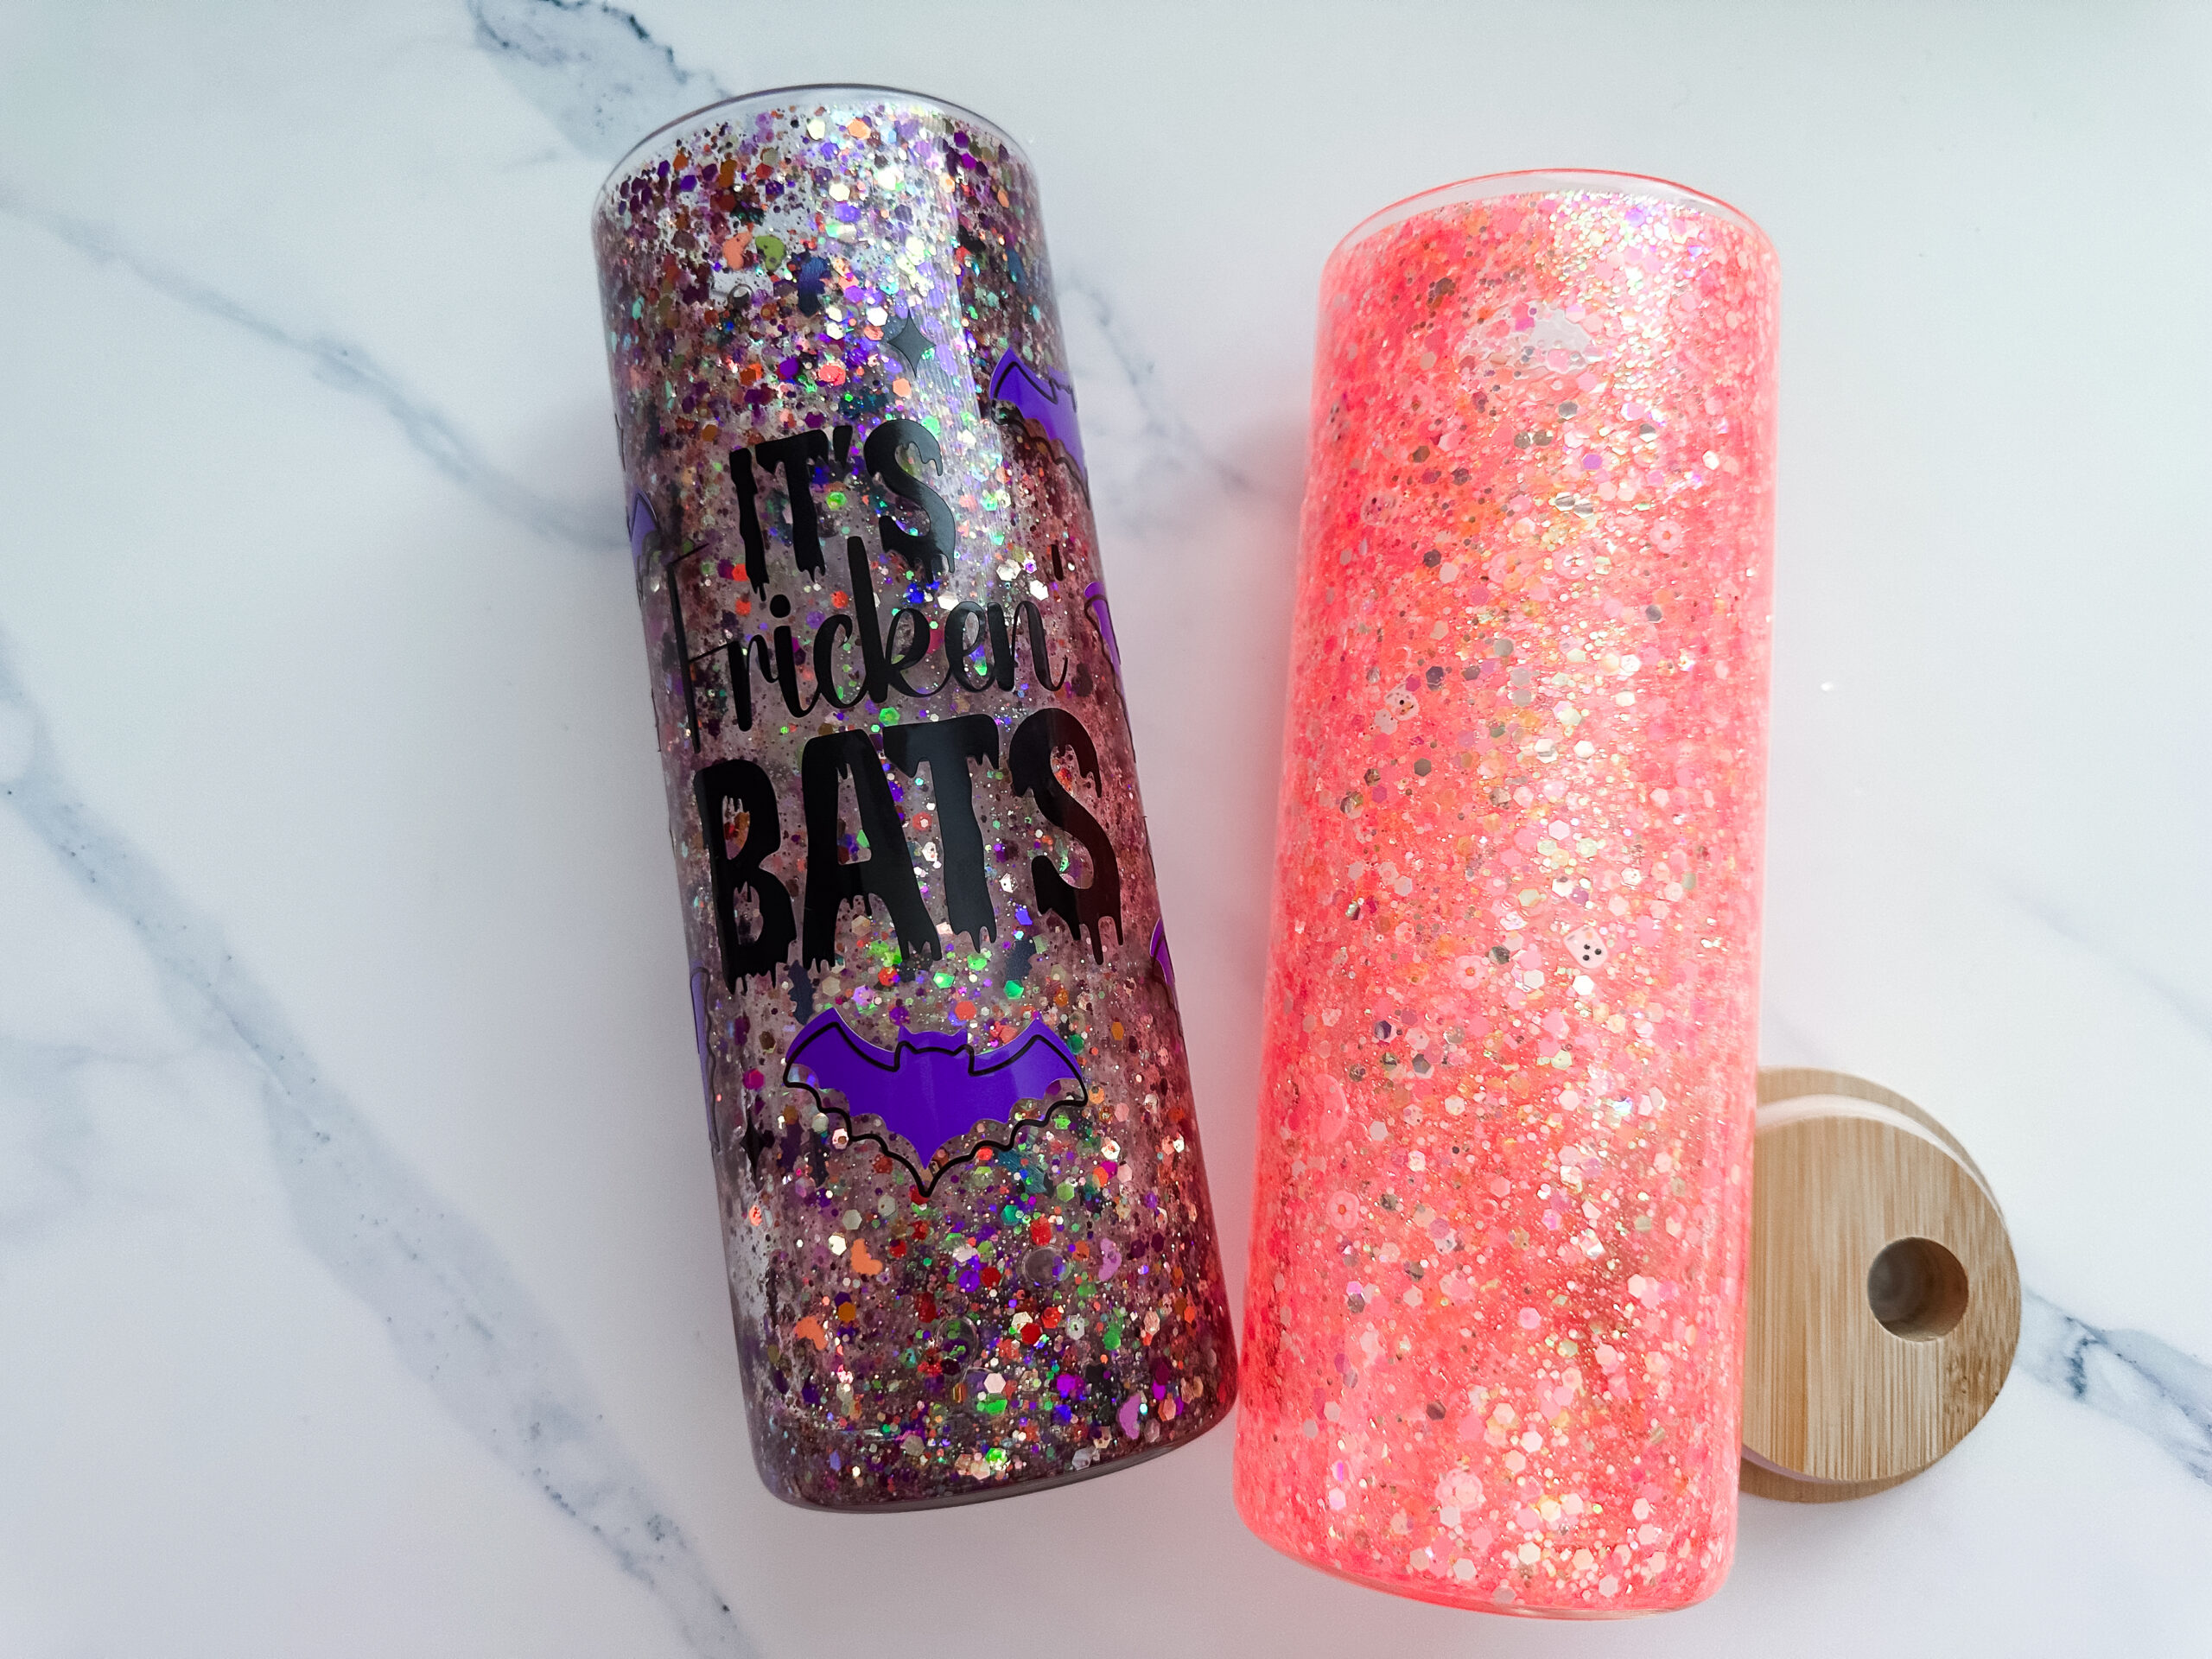
Making your own snow globe tumbler is not only easy but fun. You can customize tumblers with all different types of glitters and mica powders to get different looks. You can use fine glitter, chunky glitter, clay glitter, and glow-in-the-dark glitter. Want to give your snow globe tumbler some color? You can even add mica powders to the liquid to turn it into different colors or even glow in the dark. Then you can customize the outside of your tumbler with decals for extra flair.
What Tumblers to Use for Snow Globe Tumblers
When this sensation first took off everyone was using Starbucks Tumblers to make Starbucks Snow Globe Tumblers and you can use those, but there are also a lot of other options available. Now that making snow globe tumblers is popular they even sell tumblers with a hole already drilled, which cuts out a whole step in the snow globe tumbler-making process.
To make a snow globe tumbler you will need a clear double-walled acrylic tumbler. You can find them at Dollar Tree, Craft stores like Michaels, Amazon, and even Temu. You will want to use acrylic tumblers if you’re drilling your own hole, but you can find glass ones with predrilled holes. However, acrylic should be more sturdier against falls (but they can still break). Make sure to use high-quality, thick tumblers.
When picking a tumbler make sure to look for a sizeable gap between the external and internal plastic layers. A larger gap can make it easier for you to drill into the tumbler and fill it up with glitter. A thinner one could lead to cracking when drilling your hole. Using cheaper tumblers typically leads to thinner tumblers and when drilling through thinner ones you are more prone to cracks. So make sure you are buying thick tumblers that are good quality.
What Glitter to Use for Snow Globe Tumblers
When making snow globe tumblers you’ll want to use chunkier glitter or a mix of chunky and fine, but you don’t want to use all fine glitter. Fine glitter doesn’t look as good, doesn’t sparkle as much, it can turn your liquid a different color and clumps up a lot while in the tumbler which can cause issues.
You can also use polymer clay slices. You’ll want to look for ones that are about 5mm in size. You can find these on Etsy, Amazon, and some online glitter stores that carry them as well. When using clay slices you’ll want to mix them with a glitter mix.
As far as glitter, you can get that anywhere. Make sure to get chunky glitter or mixes that have chunky glitter. I like to get mine from Michaels, Amazon, and Etsy. There is no right amount of glitter to add, but I would say to fill 1/4th of the tumbler with glitter. Of course, you can do more or less depending on the look you’re going for.
How to Drill a Hole in a Tumbler
Now that you have your tumbler you will need to drill a hole in the bottom. If you bought tumblers with predrilled holes you can skip this step.
There are two ways to add a hole to a tumbler: You can use a drill with a drill bit or a hot fix tool.
How to Make a Hole with a Hot Fix Tool
For the hot fix tool, you will use the biggest size tip that is not flat. You want to use the tip with the curve in it. Plug in your hot tool and let it warm up for about 10 minutes. You want to put a hole in a flat spot on the bottom of the tumbler near the bottom rim. This allows the glitter to easily fall down the sides of the tumbler.
Once your tool is heated up and you have found a spot to “drill” your hole place the hot fix tool in the spot and press down with even pressure, melting a hole in the spot. Make sure to carefully watch your tool and stop once you are through the outer layer of the tumbler. You do not want to go through the next layer. Remove the hot fix tool and use tweezers or a weeding tool to remove the plastic from the tool. Be careful as it will be hot!
This method gives an even hole without the risk of crackers!
How to Make a Hole with a Drill
You will need an electric drill and drill bit. You will want the drill bit to be a bit bigger than the size of your glitter. Start slowly drilling into the bottom of your tumbler. You will want to place your hole on a flat portion of the bottom of your tumbler, near the rim. Placing your hole near the bottom rim allows the glitter to fall down the sides of the tumbler easier.
Start slowing with a low amount of pressure, if you go too quickly you can cause the tumbler to crack. Once you see that you’re making a dent in the tumbler you can add more pressure and speed. Keep an eye on how far you are drilling. Once you break through the outer layer stop and slowly pull the drill out. You do not want to go through the inner layer of the tumbler.
Clean the tumbler up and remove any of the plastic debris. If any got inside of the tumbler you’ll want to shake it out.
What Liquid Goes in a Snow Globe Tumbler
There are a few different mixes you can use and depending on the look you want will depend on which liquid combo you use.
You’ll want to use a mix of distilled water and either vegetable glycerine, clear glue, or magic liquid. The ratios are about a 50/50 mix of distilled water and your “activator” of choice, but you can use less water and more glycerine or clear glue for a slower snow globe effect.
If you want a suspended or very slow snow globe flow you’ll want to do 1 part of distilled water and 2 parts of clear glue OR a 50/50 mix of distilled water and liquid magic.
If you want a faster snow globe flow you’ll want to do distilled water and vegetable glycerine or clear glue. You can find vegetable glycerine at some stores or on Amazon.
Play around with ratios to see what you like!
Adding Special Effects to a Snow Globe Tumbler
Want to make your snow globe tumbler glow in the dark or add color to your water? To make your snow globe tumbler glow in the dark you’ll want to add glow-in-the-dark mica powder. If you want to add color to your snow globe tumbler you can use mica powder. I use this little spoon to scoop my powder and use about one scoop full.
You can add your mica powder to your liquid when you go to mix it or you can add it in with your glitter. I prefer to add it with the glitter so I don’t have to rinse my bottles out as often.
How to Add Liquid to a Snow Globe Tumbler
There are a few ways you can add your liquid to your snow globe tumbler, but I like to use a squirt bottle. You can use a squirt bottle, a condiment bottle, or a funnel.
If using a squirt or condiment bottle you’ll pour your liquids into it, close it, and shake until well mixed. You can place the tip of your bottle into the hole on your tumbler and slowly squeeze it in.
If you’re using a funnel you’ll need to mix your liquids in a container that is easy to pour from, like a measuring cup. Place the funnel in the hole on your tumbler and pour the liquid into it slowly.
How to Seal a Snow Globe Tumbler
When it comes to sealing your snow globe tumbler you will need something to cover the hole and then UV resin to fully seal it. There are a few ways to cover the hole such as:
- Using a small piece of clear packing tape – Use a piece slightly bigger than the hole and place it over the hole.
- Use Adhesive Dots – You place the dot over the hole to give it a seal.
- Use Clear Furniture Bumpers – You will place this in the hole of the tumbler to seal it. You can use a hook weeding tool or tweezers to help you maneuver it into the hole.
Then you’ll need UV resin with a UV lamp to fully seal the bottom. Once the hole is covered you’ll cover the bottom of the tumbler with UV resin. If you see that your UV resin has bubbles you can run a heat gun or lighter over the top to release them. Then place the UV lamp over the top to set the resin.
When working with resin make sure to wear gloves, and an appropriate face mask such as an N95 or half-face respirator mask, and work in a well-ventilated area. UV resin cures in sunlight so make sure you are not working in direct sunlight!
Degassing Snow Globe Tumblers
When making your snow globe tumblers you’ll want to degass them. This allows all of the air to get out of the liquid and makes sure your snow globe tumbler has maximum liquid. This process takes a few days and is a bit of a process. You can skip this step, but you could end up with lots of bubbles in your liquid or impacted glitter later on.
How to degas snow globe tumblers: When filling your tumbler with liquid you are going to add some liquid to the tumbler and then add all of your glitter. You’ll add some more liquid and swirl your tumbler around to mix the glitter and liquid together. You will then fill the rest of your tumbler with liquid to the top. When doing this you will create some bubbles in your liquid.
Give the tumbler another good swirl so that you combine the glitter and liquid well and then let the tumbler sit for about 6-8 hours. You can cover the hole on your tumbler with a piece of painter’s tape while it’s degassing or place a paper towel over it so nothing falls inside. Any bubbles you had should be gone and the liquid should be a little lower. You are then going to add more liquid, do another swirl, and let it sit again for another 6-8 hours. You might need to repeat this process 3-4 times. The goal is to fill the tumbler all the way up with liquid while removing all the bubbles from the liquid. As the glitter settles into the liquid it can also cause the liquid to go down.
Once you are done degassing your snow globe tumbler, this process should be done for about 2-3 days, and your liquid is to the top you might notice some micro bubbles at the top of the tumbler. You can add some 70% rubbing alcohol to a spray bottle and give the bubbles a few sprays. This will cause them to pop and then your tumbler is ready to be sealed.
How to Make a Snow Globe Tumbler with Glitter
Let’s make our tumbler! Here are the supplies you’ll need:
Drill with Drill Bit OR Heat Fix Tool
Chunky Glitter and/or Polymer Clay Slices
Vegetable Glycerine, Clear Glue, or Magic Liquid
Distilled Water
Rubbing Alcohol in a spray bottle
Gloves & Face Mask (for working with UV resin)
Lighter or Heat Gun
Make a Snow Globe Tumbler
In depth instructions are at the top of this post. I give tips, tricks, and lots of info on how to properly make your snow globe tumblers. Please make sure to read through them all.
Step 1: Get your double walled tumbler and add a hole using a drill bit or hot fix tool. You want to drill a hole in a flat space of the tumbler near the edge/rim of the tumbler. When using a drill make sure to go slowly so you don’t crack the tumbler.
Step 2: Add your Liquid to a Bottle. You will use a 50/50 mix of distilled water and then your liquid of choice. You can use vegetable glycerine, clear glue, or magic liquid. Use a squeeze bottle or funnel to add liquid to the tumbler. Fill your tumbler about 1/3 of the way.
Step 3: Add Glitter. You can use a funnel to add the glitter or you can pour it into the hole and push the glitter in with a skewer, toothpick, or hook weeding tool. You’ll want to add glitter a little at a time. Push the glitter in, give it a shake to get it down the sides of the tumbler, add more, and repeat until you have the desired amount of glitter you want. This is also when you would add polymer clay slices and mica powder. If you find the glitter isn’t going down you can add some more water to help it move down the sides of the tumbler. There is no right amount of glitter to add, but I would say to fill 1/4th of the tumbler with glitter. Of course, you can do more or less depending on the look you’re going for.
Step 4: Add More Water. Fill the tumbler with water to the top and give it a good shake/swirl. Make sure to cover the hold with your finger or a piece of painter’s tape before shaking it so you don’t spill water everywhere.
Step 5: Degas your Tumbler. You will want to let your tumbler sit for several hours so that all the air in the liquid rises to the top. You can skip this step, but not letting the tumbler degas can cause impacted glitter later on, air bubbles and low liquid once sealed. Full steps on degassing a tumbler are above.
Step 6: Clean your Tumbler. Once your tumbler is ready to be sealed you’ll want to clean the top of the tumbler really well with rubbing alcohol and a lint free cloth or coffee filter. This removes any dust, debris, and oils from the tumbler. If you are using vegetable glycerin it does have oil so you’ll need to make sure to clean it really well. If the tumbler has oil on it the resin won’t seal and cure properly which can lead to leaking and air bubbles.
Step 7: Seal your Tumbler. Place an adhesive dot over the hole and press it down firmly. Add a dot of UV resin over the adhesive dot, making sure that it completely covers the dot, and around the dot, you are not sealing the whole top. Seal the UV resin per the instructions, but it should be about 120 seconds. You will then place more UV resin, this time covering the bottom of the tumbler. Once you have an even layer of resin run a heat gun or lighter over the top of the resin to remove any air bubbles. Seal the UV resin with the UV light.
Step 8: Add a decal (optional). If you are going to add a decal to your tumbler now is the time to do it. You can add a decal with vinyl or DTF transfers. There are some sublimation snow globe tumblers available, if you are using a sublimation tumbler then you need to sublimate the tumbler first!
How to Wash Snow Globe Tumblers
Snow Globe Tumblers should be hand washed in warm water. Do not soak them and do not place them in a dishwasher or microwave.